Knowing how to replace your door handle is very useful. Today your Locksmith Tampa explains how to proceed step by step. So you should get there without any problem! And in case of doubt, you can always contact us for intervention in Locksmith Tampa Bay Area.
The door handle is the tool that allows you to activate the latch bolt. You open, you close. But it is also an object of finishing and decoration.
Is your door handle damaged? Or are you changing the decor? So here is our tutorial on how to replace your door handle.
Disassemble and change your door handle
The first thing to check is the nature of the door handle to be replaced.
- Support Type: Does the kickstand mount on a plate or a rosette?
- Type of closure: Is it a simple handle or with a key lock or even a condemnation?
- Fixing center distance: If the center distance is the same, there is no need to drill new holes (plate model).
A. Disassemble and replace your door handle on the plate
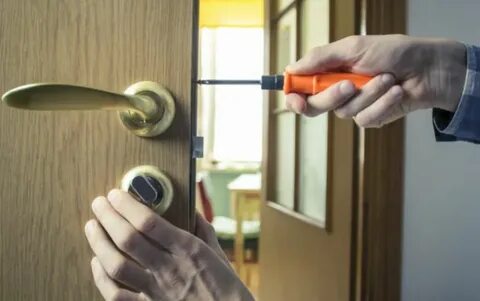
- With a screwdriver, unscrew the two fasteners that hold the plate.
- Grasp the handle on each side and pull gently. The two parts of your doorknob should come out quite easily, one of which has the square axis.
You do not have to choose a plate with the same center distance as the old one. But in this case, you will have to drill new holes in the door for the fasteners. Likewise, the old holes may be visible if the new plate is shorter than the old one. You will then need to recap them.
So, if it is necessary to drill :
- Present the new door handle on its future location to mark the two drill holes with a pencil.
- Make the two holes in the door (you must go through the door completely while remaining straight). Use a wood bit (if the door is wood, of course, which is usually the case) suitable for the size of the fasteners. Classically we find 6 mm.
Then we resume:
- Place the new door handle in its final location. Place the side with the axis first; installing the second side will make it easier.
Please note, some door handles have a predefined opening direction. It may not be suitable for what you want to set up. No problem. On these models, the opening direction is locked by a clip holder. Just remove it to change direction. This operation is much easier to carry out with unclipping pliers.
- Screw the two plate fasteners.
- Check the correct operation of the system.
And There you go! You have just disassembled and replaced your door handle on the plate!
B. Disassemble and replace your door handle on rose
- Remove the rosette cover (remove or unscrew by hand).
- Remove the fixing screw at the kickstand base with a suitable Allen key. This screw is usually found under the kickstand or sometimes on its inner side. This screw secures the crutch to the square axis.
- Using a screwdriver, unscrew the rosette fixing screws highlighted by removing the cover.
- Now remove both sides of the handle. Note that you do not need to remove the fixing screw under the second kickstand. The axis will come with it, that’s all.
- Take your new handle on the rosette and remove the covers.
- Place the new door handle in its final location. Install the side with the axis first to facilitate the installation of the second side.
- Screw the rosette fixings with the screwdriver.
- Screw the fixing of the kickstand with an Allen key.
- Replace the rosette cover.
- Check the correct operation of the system.
And it’s done! You have just dismantled and replaced your door handle on the rose!
Change interior door handle for a button model
Why Opt for a model with a lock button?
For privacy, it is useful to lock interior doors as well. This is particularly the case for a toilet door or a bathroom door.
It is safer to use a door handle with a locking button than a conventional key lock. Some models of button handles are fitted with a safety device on the outside. This allows the door to be unlocked with a simple screwdriver. In addition, you can intervene if the person inside has a problem.
How to make the change?
This is a good question because a button door handle cannot fit through your mortise lock.
Just like the crutches, the locking button requires a square axis. This is not compatible with a mortise lock that you will remove from the door.
- A priori, it should be a plate handle. Therefore, follow the previous instructions to remove the old door handle: see A.1 and A.2.
- Remove the two fixing screws from the faceplate of your lock (observable from the edge of your door). If in doubt, you can read our article on the different elements.
- Remove the entire lock block.
- Install the new lock block. You will notice that this one has two square holes to insert the axes.
- Screw on the headrest fixings. The lock is in place!
- Proceed as already stated to assemble the new handle: see A.3 and A.4 (and possibly A.2.5a and A.2.5b if the center distance differs).
- Check the correct operation of the system.
That’s it! You have replaced your keyed lock with a push-button lock with a safety release.
Replacement of your door handle
We have presented these three tutorial variants to you to help you with your door handle replacements. But maybe you don’t feel like it or can’t do it yourself?
We can dismantle and replace your door handle if you live in Tampa, Florida. We travel to homes and businesses. Just contact us, your locksmith near me Tampa bay specialist Locksmith tampa bay fl.
Read more Articles visit : https://casinopost.org/